The ImageGrid function lets the user click to select a certain part of an image, e.g. to mark a seat that has stains. The developer creates the clickable area by superimposing a resizable grid over the image.
The ImageGrid function allows developers to place transparent, rectangular grids over any image. The grids are resizable to divide the image into an arbitrary number of selectable cells. The developer assigns a unique name, e.g. crew_4 or seat_14, to each clickable cell which is used in the wrap to identify areas with stains.
Example: During the inspection of a train, a stain on a carpet or a seat in a carriage need to be reported for cleaning. An ImageGrid is placed over a photo or drawing of the carriage to allow the inspector to click on the stained location. Clicking on an image saves a lot of time and reduces the risk of errors, compared to entering seat numbers or floor locations as text. A Raise New link conveniently opens a new stain report for the selected seat or carpet.
The ImageGrid function supports nested grids, which allows you to subdivide the image into smaller portions before you create the actual clickable regions. You can mark certain cells as unselectable if the corresponding area of the image will never be used for reporting.
The ImageGrid function returns the selected cell name, if any. Example: If there is an ImageGrid function in cell B15 in an inspection wrap, and the grid cell seat_14 has been selected in the image grid, cell B15 in the wrap returns “seat_14” as a text string.
Unlike most other widgets and functions, the ImageGrid function does not have many options set for it in Excel. Most of the design work is done online, using a web browser. You define an ImageGrid in a separate setup wrap template that only needs to contain an ImageGrid function.
All these steps will be described in detail below.
Before you design the setup wrap template, you should consider how you will copy the resulting grid configuration to the inspection wrap templates that will use the ImageGrid. You can do this manually as described above using the Copy Config button in the grid properties.
It is also possible to propagate the most recent grid configuration automatically, to all inspection wrap templates at once, using WrapLinks to the setup wrap.
To design an ImageGrid, you use its setup mode which has a web-based user interface.
In Excel, open an empty spreadsheet and insert an ImageGrid function into any cell using the following function:
=ImageGrid("setup")
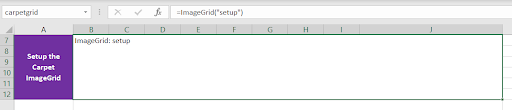
Make sure the cell is big enough to fully display the image you intend to use. There are many ways to make adequate room for a widget; read more in the Introduction to using widgets.
You may want to add a freeze signature to your setup wrap templates that locks the setup wrap from further modifications.
In most cases, you should only copy the setup configuration from signed and frozen setup wraps. This way, you guarantee that the inspection wrap templates only use tested, stable, and approved ImageGrid configurations. The only time you should use an unsigned setup configuration is while you are testing it during development.
We recommend that you version control your ImageGrid per car or whatever entity it is for, so that you do not break old wraps if the ImageGrid needs to be changed later. This means you should use an AutoNumber field for the setup wrap template, with each autonumber representing a new version of the grid configuration. In combination with a freeze signature, you can then use the LastFrozen parameter to automatically select the most recently signed-off version of a grid configuration.
We do not support running an ImageGrid setup wrap as a TeamWrap.
Convert the setup wrap template with WrapCreator.
Import the converted setup wrap template into the wrapsite.
Ensure that the image you will use for the ImageGrid has been uploaded to the wrapsite and that you have a working link to it.
To make the same image link work in both the test and production environments, we recommend you always link to it using the relative address of the image i.e.
/media/guide/imagegrid/801-1car5.png
After you have converted and uploaded the setup wrap template, it should now be visible on your wrapsite together with all the other wrap templates.
Create a new setup wrap and open it in a web browser.

Right-click on an existing image and you should see a context menu with an option to Change Image. This allows you to select a better image. You should do this before you start adding grids.
The image is opened in its original size which may not be suitable for wraps. There is an image resize handle on the righthand side of the image as indicated by the red arrow below, and at the bottom of the image. This resizes your image while maintaining the aspect ratio so that the image will not be distorted.

The image cannot be resized after you have added a grid to it. Make sure the image size is exactly correct. If you find that you need to resize the image after you have added any grids to it, you will have to start over again.
The current size – width and height in pixels – is displayed in the yellow tooltip.

Always fnish an outer grid before you insert any inner grids for it. Ensure that the number of rows and columns and their position is correct. Once you insert an inner grid, you cannot change its outer grid.
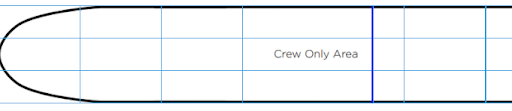
Grids are symmetric, i.e. all the cells in a certain row have the same height, and all the cells in a certain column have the same width. In most cases, you will need to subdivide the image into smaller areas where these symmetric grids can be adjusted to match the seats, carpet sections, or whatever physical entities on the image you are trying to create cells for in the grid.
Right-click on the image and you should see a context menu with an option to Insert Grid. This will add an outer grid onto the image with the designated numbers of rows and columns.

When you click on Insert Grid a dialog box appears.
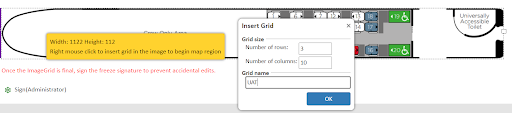
Specify the number of rows and columns. You don’t have to get this right the first time. You can add and remove rows and columns later, or remove the entire grid and start over.
Give the grid a name. When cell names are suggested by the widget, the grid name is used as a prefix to automatically create names like UAT_1, UAT_2 etc.
Try to use grid and cell names that are useful to someone physically present in the carriage. If you need several separate grids to map all the seats, you may want to give each grid a section name that suggests a physical location, e.g. left1, left2, etc for the grids to the left of the aisle, and right1, right2, etc for the right-hand side of the carriage. If a cell is mapped over seat 14, it is better to call it seat_14 than blue_7.
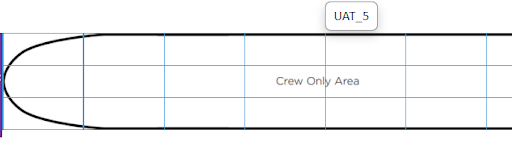
When you press OK, the grid is inserted and its gridlines appear. Different line colors are used for each grid.

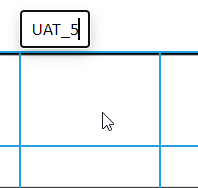
Each cell already has an automatically assigned cell name. Hover the mouse over each cell to see its cell name. Double-click on the cell name to change it. You can rename the grid and its cells using the Rename option in the context menu described below.
If a cell is unnamed, it cannot be selected. This can be useful for an area of a carriage where there cannot appear stains, e.g. a cable shaft.
The rows and columns of the grid are resizable, just drag the gridlines to their proper position. Mouse hover on a gridline until a thick blue line appears with a resize cursor, then drag the line to the new position.
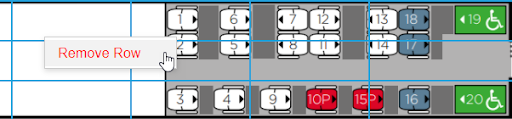
Right-click on a row grid line and click Remove Row to remove it.
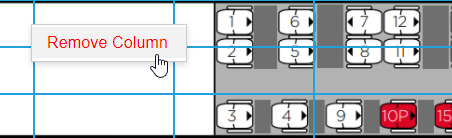
Right-click on a column grid line and click Remove Column to remove it.
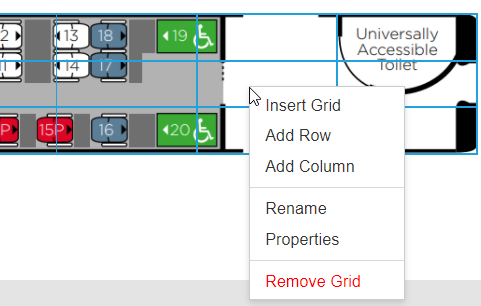
If you right-click on any cell, you will see a context menu. You can add an inner grid into the current cell. You can add a row or a column to the grid. You can rename the cell or grid. You can set the grid’s properties. You can remove the grid and any grids nested within it.
Right-click on a cell where you want to insert an inner grid and click Insert Grid.
If a cell is resized, and it contains an inner grid, the rows in the inner grid return to their initial state.
If you leave the new grid without a name, nothing in the grid can be selected. It has the same effect as removing the name of the cell containing the grid.
Each inner grid uses a different color for its gridlines to help distinguish between grids.

Right-click on any cell of a row where you want to insert a new row and click Add Row. The new row will appear in the middle of the existing rows.
Right-click on any cell of a column where you want to insert a new column and click Add Column. The new column will appear in the middle of the existing columns.
You may want to enter a new name for a cell to use instead of the automatically generated one. You can rename a cell by double-clicking on it, typing the new name, and pressing Enter.
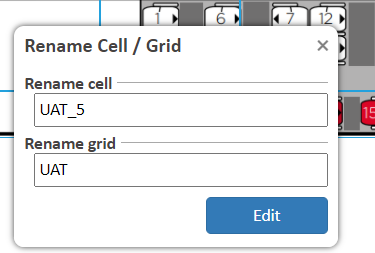
You can also right-click on a cell that you want to rename and click Rename. This also lets you edit the name of the entire grid to modify the automatically generated cell names. This does not affect the cells that you have renamed but changes the name of all the other cells.
If a cell is unnamed, it cannot be selected. This can be useful for an area of a carriage where there cannot be stains, e.g. a cable shaft. Use the Rename operation to remove the name for a cell.
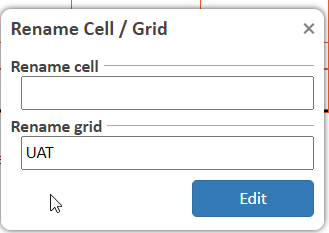

If a grid is unnamed, nothing in the grid can be selected.
The Properties dialog allows you to copy the image link and its width and height.
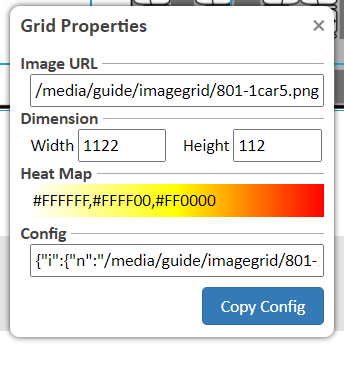
The ImageGrid can use different background colors for different cells. This allows you to give a quick indication of something like the relative number of previously reported stains for each seat or carpet area, e.g. as white, yellow, and red. This background color scale is called a Heat Map.

The image grid above uses the default color scale white-yellow-red, but you can select any three colors you like. Type three standard color names or hexadecimal color codes separated by commas into the Heat Map field. Leave the field to update the preview of the scale in the same field.
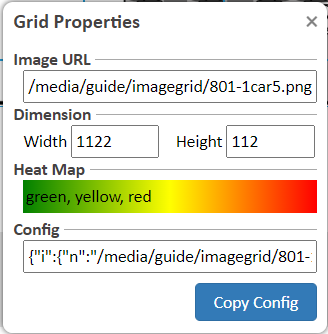
The Config field contains a JSON-formatted text string with the complete grid configuration.
The Copy Config button copies the complete ImageGrid configuration to the clipboard. Go back to the setup section to see how you can paste it into a new setup wrap. Read more below on how to copy the grid configuration to an inspection wrap.
Right on any cell in the grid and click Remove Grid. This removes the current grid and all the inner grids it contains.
Once the ImageGrid has been set up, you can use it in other wraps. These are typically inspection wraps where the ImageGrid is used to report new stains. You copy the grid configuration from the setup wrap to each inspection wrap template and use it with a new ImageGrid widget that essentially becomes a clone of the setup ImageGrid.
In Excel, open the inspection wrap template that you will use the ImageGrid with. If you don’t already have an inspection wrap template, create that spreadsheet now.
Create a new sheet in the inspection wrap template. You can call it anything but in this example, we will refer to it as Config.
Hide the configuration sheet for non-administrator roles using the Hide sheet by role setting on the Sheets tab.
Go to the setup wrap.
During testing, you can copy the grid configuration anytime. When copying a production grid, you should sign off the setup wrap before you copy the grid configuration, to signify that it is in a tested, stable, and approved state.
Open the ImageGrid properties using Properties on the context menu.
Press the Copy Config button to copy the underlying string representation of the grid in the Config field to the clipboard.
Paste the configuration from the setup wrap into a cell on the hidden sheet in the inspection wrap template. We used Config!A3. Make the configuration cell a wrap input field so that the ImageGrid configuration is saved in the database for each wrap.
In the inspection wrap template, select the cell where you want the ImageGrid to appear and insert a function call similar to this:
=ImageGrid(“inspection”,Config!A3,””,””,””)
This function call says that we are creating a clone that we call inspection. Ensure that the second parameter points to the cell with the grid configuration you just copied from the setup wrap. The full syntax of the ImageGrid function call is described below in the Function reference.
Just as with the setup wrap, you need to make sure the cell is big enough to display the entire ImageGrid. The easiest way is to merge adjacent cells to create a big enough area.
ImageGrids work fine in TeamWraps but do not sync a user’s cell selection with other users of the same TeamWrap. This is by design, to allow different users to simultaneously Raise New stain reports for different seats or carpet areas.
When you are done with the changes to the inspection wrap template, convert it and upload it to the wrapsite. When you create a new wrap from the updated wrap template, the ImageGrid will appear, with the layout you designed in the setup wrap.
If something doesn’t look like it should, don’t hesitate to contact Client services, we know this can be tricky at first.
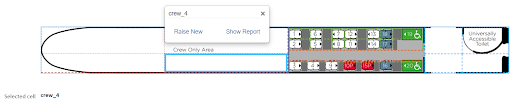
A cell’s name is displayed in the tooltip when you hover the mouse over a cell.
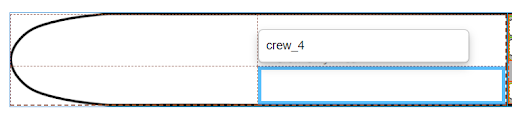
In the ImageGrid, the selected cell has this thicker blue border.
The ImageGrid function returns the name of the selected cell as a string value, in this case “crew_4”, in the wrap cell where it resides.
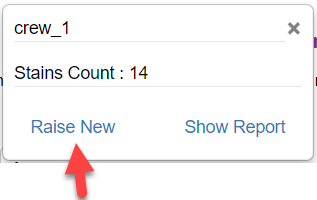
When you click on a cell to select it, a menu appears.
Raise New is a predefined link that typically creates a new wrap to document a new stain. A template link is defined in the ImageGrid function, with a placeholder that is replaced by the current cell name which is used to pre-fill the ticket.
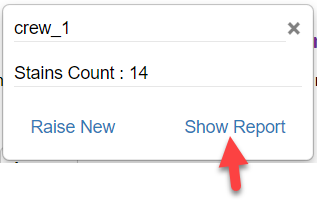
Show Report is a predefined link to a MyWraps report that typically shows all the stain reports for a certain area or seat. A template link is defined in the ImageGrid function, with a placeholder that is replaced by the current cell name which is used to filter the report.
The ImageGrid can use different background colors for different cells. This allows you to give a quick indication of the relative number of previously reported stains for each seat or carpet area, e.g. as white, yellow, and red. This background color scale is called a Heat Map.
The source data for the heat map is provided as a two-dimensional XYTable. The first column contains the grid cell name, the second column a relative number, e.g. the number of previously reported stains for the grid cell.
By default, the background color for the cells in the grid changes from white for the lowest values, to yellow for the intermediate values, to red for the highest values. The colors can be changed in the Grid Properties dialog.
The background color is opaque so the user can still see the image beneath it.
In the screenshot, you can see data from the heat map table presented also in the tooltip for each cell. “Stains Count” is the column header of the second column in the heat map data table and it is automatically used as the caption here.
You can use a WrapLink to dynamically fetch the most recent grid configuration from a setup wrap. The WrapLink is placed on the Config sheet in the inspection wrap template, in the cell where you would otherwise paste the configuration data as a text string, Config!A3 in the example below.
The WrapLink points to the cell name of the ImageGrid widget in the setup wrap.
The ImageGrid clone in the inspection wrap template designates the WrapLink cell as its configuration cell.
=ImageGrid(“inspection”,Config!A3,””,””,””)
Consider using these features in the WrapLink:
Updating the configuration data automatically has obvious advantages:
It also has a few disadvantages:
=ImageGrid(mode, config_data, heat_map_data, show_report, raise_new)
The ImageGrid function returns the name of the currently selected cell in the grid as a text string. If no cell has been selected, the function returns an empty string.
All parameters can be specified using cell references, e.g. Config!A3 or grid_config. It is also possible to include all parameters as text strings directly in the function call, but it’s usually easier to manage each parameter in its own separate cell.
mode is a mandatory quoted text string that identifies the “setup” operation or names the ImageGrid with any other text.
config_data Contains the ImageGrid config string, copied from the setup wrap. Mandatory for inspection wraps.
heat_map_data is an optional XYTable used to dynamically select a background color for each cell at runtime that reflects a relative property, e.g. the number of previously reported stains for a seat or carpet area.
show_report is an optional link, typically to a MyWraps report, with a placeholder where the selected cell name is inserted at runtime.
raise_new is an optional link, typically to a new wrap, with a placeholder where the selected cell name is inserted at runtime.
Provides an XYTable with the data for the grid’s heat map. An XYTable is a text string that contains tabular data. Every row is delimited by a pipe “|” character. Every column is delimited by a semicolon “;” character. The screenshot below contains an example of an XYTable.
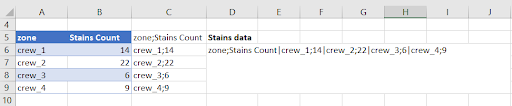
In the screenshot above, you can see what this particular XYTable would look like, with semicolons as the column separators and pipe characters as the row separators.
The ImageGrid function designates the heat map data with its third parameter:
=ImageGrid("inspection",Config!A3,Data!D6,"","")
When a cell is selected, a Show Report link appears that can be used to request the report for each seat or carpet area in a separate tab. A placeholder in the report link is replaced at runtime by the selected cell name in the inspection wrap.
The report URL is typically a MyWraps link. but it can also be a common wrap link.
/MyWraps/carpet-stains?Options.MaxRows=500&Options.Title=Wraps+for+carpet-stains&Options.Columns=inspectionno.string%2Ccarno.string%2Czonename.string%2Cstaintype.string%2Cstainphoto.med-image-small&Filter.carno=1&Filter.zonename=<placeholder>
Clicking on the Show Report link with the crew_1 cell selected will open this link:
https://guide.staged.excelwraps.com/MyWraps/carpet-stains?Options.MaxRows=500&Options.Title=Wraps+for+carpet-stains&Options.Columns=inspectionno.string%2Ccarno.string%2Czonename.string%2Cstaintype.string%2Cstainphoto.med-image-small&Filter.carno=1&Filter.zonename=crew_1
When a cell is selected, a Raise new link appears so that the user can raise a new issue directly from the ImageGrid. The raise_new link in the function call must create a new wrap and often has an AutoNumber in the unique key in order to give each stain report a unique key. A placeholder in the report link is replaced at runtime by the selected cell name in the inspection wrap.
/Wraps/carpet-stains?carno=1&inspectionno=*&zonename=<placeholder>
Clicking on the Show Report link with the crew_1 cell selected will open this link:
https://guide.staged.excelwraps.com/Wraps/carpet-stains?carno=1&inspectionno=*&zonename=crew_1