The Wrap tab contains settings that control the conversion of an Excel spreadsheet to a wrap.
The Wrap tab of the task pane contains settings for the converted wrap. These settings are saved with the spreadsheet.
WrapCreator obtains important information about existing wraps, users and groups from the wrapsite properties for the server subdomain that you are using. All this information is useful when you design and test the wrap in the Excel development environment. As a reminder, the Wrap tab always shows the name of the wrapsite from which it gets these properties. For new wraps, the wrapsite on the Account tab and its wrapsite properties are used by default.
When you load a wrap that has previously been using different wrapsite properties than on the Account tab, a “switch” symbol appears on the Wrap tab, see below. Click on the switch symbol to use the wrapsite properties on the Account tab also for the current wrap. This is mainly useful for our client services team that regularly switch between wrapsites.
![]()
There is more information about wrapsite properties on the help page for the Account tab.
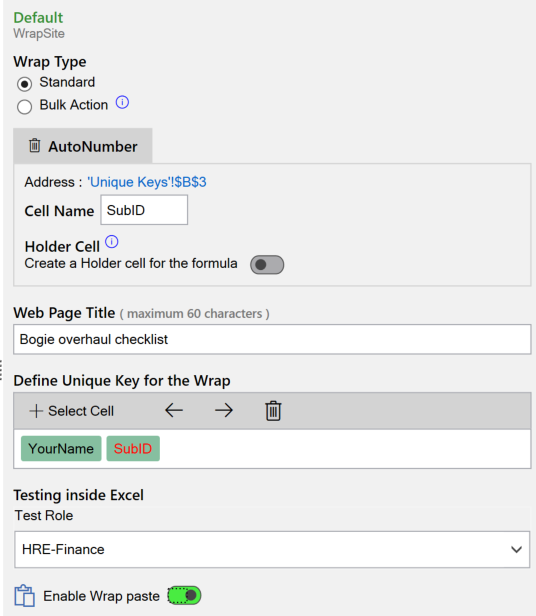
For most wraps, you should select the Standard type.
Bulk Action wraps make it easy to apply the same change to multiple wraps, which can save a lot of time and reduce the risk of errors. Read more on the help page for Bulk Action wraps.
A wrap that is only used for navigation or other special purposes usually doesn’t have any input fields. For such wraps, use the No Save setting to remove the Save, New, and Delete buttons from the wrap’s toolbar.
Team Wraps can be used by two or more users simultaneously. Read more on the help page for Team Wraps.
When you define a wrap, one of the most important issues is how you intend to refer to each instance of the wrap. All wraps have one or more keys, e.g. a unique number designating the building, room, employee or vehicle it represents. Other keys may relate to time, e.g. when an error was reported, when work was started and when work was signed off as completed.
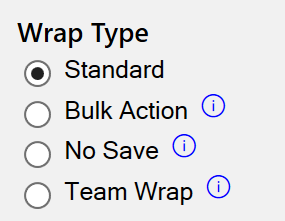
In the screenshot below, the SubID field contains an AutoNumber, an automatically generated key that assigns a serial number to each wrap instance.
Example: For a vehicle, you can create a wrap for error reporting that uses the vehicle number as the main key. To make it easier to navigate, you may then add an AutoNumber as the second key. All errors reported for this vehicle will then get a unique serial number that automatically advances by one for each new error report. Example: If the vehicle is identified as BD51SMR, the first error report will have the keys BD51SMR-1, the second BD51SMR-2, etc.
If a wrap uses an AutoNumber, it must be the final part of the unique key combination.

When a wrap uses an AutoNumber, special navigation keys appear in the toolbar that allows you to advance back and forth through the related wrap instances. You can go directly to the first or last instance, or directly to a particular instance number.

The AutoNumber property for a wrap is assigned on the Wrap tab, and designates the cell in the wrap that will hold the serial number. This cell must be named and cannot be modified.
The AutoNumber cell can be used to filter a list of wraps, e.g. in reports.

Select the cell in the wrap where the automatic counter will appear.
An AutoNumber cell is an input cell and must always have a name.
While you test the wrap in Excel, you can provide a test value in a special holder cell to verify that other formulas in the wrap return the correct results. When you upload the wrap, live data automatically replaces the test value in the holder cell. For an AutoNumber field, the holder cell contains a simulated serial number for the test instance of the wrap.
Select the cell in the wrap where the holder cell will appear. You can change the location by clicking on the “pen” symbol and then selecting a different cell as the holder cell.
Holder cells sometimes contain information that you don’t want to show to the user of the wrap. In this case, tick this box to make the contents of the holder cell invisible in the wrap.
This is the value that the holder cell will contain during testing in Excel. When the wrap is running on the server, real values from the database are used, and the dummy value has no meaning.
For an AutoNumber field, the server will always return an integer at runtime, so the holder cell must contain an integer value also during testing in Excel. Example: 1
In the example above, the following cell formula is inserted in the cell.
=@AutoNumber()
This tells the server where to place the AutoNumber in each Wrap instance.
=@AutoNumber()
The AutoNumber function has no parameters. There can be only one AutoNumber function in a Wrap. You can create one or more Holder cells for it.
You can use a Holder Cell to provide a dummy value to test the wrap already in Excel. When the Wrap is run on the server, the live AutoNumber returned from the cloud database for the current instance is inserted also the holder cell.
=@HOLDER(cell_name, dummy_value, hidden, holder_item)
cell_name points to the AutoNumber cell using its cell name.
dummy_value contains a value you want the cell to provide during testing in Excel – at runtime, real values from the server are used instead. The dummy value must be an integer because this is the data type that will later be returned by the server.
hidden if set to TRUE, makes the contents of the holder cell invisible in the wrap.
holder_item is always empty for AutoNumber.
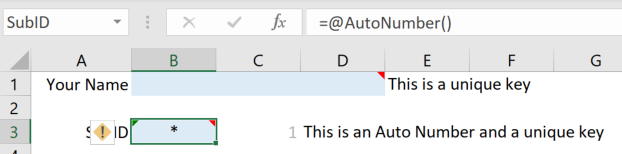
=@HOLDER('Unique Keys'!$B$3;1;TRUE;"")
You should assign a title for each web page you create. The title appears on the browser tab for the Wrap.
![]()
With many tabs open, you only see the first 15 characters or so of the title. You should put the most distinguishing information in the beginning.

If you don’t specify a page title, the file name is used as the page title.
Every instance of a wrap must have a unique key that identifies what information the wrap instance contains. In a list of assets, you’ll probably use an inventory number of some kind to identify each unique laptop, railway car or whisky barrel.
Complex assets break down into subcomponents. A railway car has bogies at both ends to spread the weight of the car over more wheel pairs while still permitting the wheels to freely follow the curvature of the track. In this case, we need an identifier for each bogie so that faults and repair can be reported for the correct bogie.
The keys used for a wrap must all be present in the wrap. Each key is stored in its own named cell.
To define the unique key for a wrap, add all the named cells that contain the key parts to the Unique Keys field one by one using the “+” plus button.
The order of the keys is important. It defines the hierarchy of things, the order in which various things decompose into subcomponents and thus consist of each other. This order is usually obvious – if a wrap describes a railway car bogie, the car number goes before the bogie number in the unique key, because the bogie is always attached to – a component of – the same car.
If a wrap has an AutoNumber, it must be the last part of the unique key.
Some aspects of a wrap can usually be tested inside Excel, without connecting to the database. For this to work, the wrap needs some of the information that it otherwise would get from the wrapsite server. As an example, when the wrap is used in real life, the current user would always be logged in, and through this have a particular set of roles.
When testing a wrap inside Excel, you can simulate a logged-in user by assigning different Test Roles on the Wrap tab and see how the selected role changes the behavior of the wrap.

When you copy data between two windows, you usually copy one field at a time, paste it in, then go back to fetch the next field. If there is a lot of data to copy, e.g. many rows and columns in a table, copying one field at a time can be very time-consuming.
If you are copying data from Excel to a Wrap, ExcelWraps allows you to save time by copying larger chunks of data at the same time. To enable this feature you must select the Enable Wrap paste option on the Wrap tab of the task pane before you convert the spreadsheet.

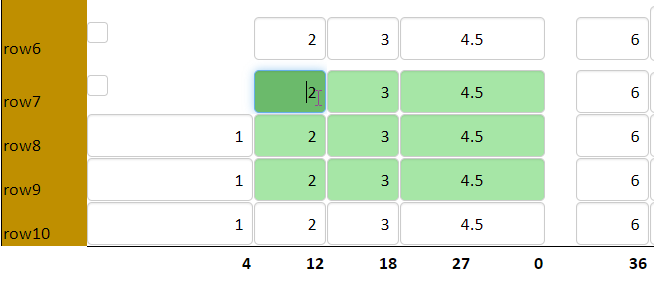
ExcelWraps has special support for tabular data in rows and columns that comes from Excel. If you copy a cell range in Excel and select an input field on a Wrap, all the fields that will be affected by the paste operation will be highlighted. The highlighted area always has the same proportions as the cell area in Excel, so if you copy a 2×2 area like C3:D4, you can only paste these four fields into a 2×2 selection of input fields on the Wrap.
In the screenshot below, we copied a 3×3 cell area from Excel, then placed the cursor in one of the input fields of a Wrap. As you can see, the highlighting clearly shows you what fields will be affected by the area paste. Notice that the right-most column – the one with the sixes – is unaffected by the 3×3 range that is being copied.
When you’re happy with the selected field range, just press Ctrl-V to replace the content of the highlighted fields with the corresponding contents from Excel.
Upon completion of the paste operation, the Wrap is automatically recalculated.
You can only paste into fields that are open for input. Only three field types are currently supported: Wrap input, Text widget, and Dropdown widget.
The input fields that we paste into don’t have to be absolutely next to each other. You can have intermediate sections of field labels, calculated output cells or other unsupported field types, or blank rows and columns. Just verify that you accept the automatic selection of fields to paste into before you press Ctrl-V.
For security reasons, your web browser may be protecting the data on the clipboard. In this case, it will issue a prompt the first time you select an input field in the Wrap. Click Allow or similar to enable the Wrap to see if you have prepared for an area paste.

Wrap paste may run out of fields to paste into. This can happen when the cell range on the clipboard contains more rows or columns than are available in the Wrap, starting at the currently selected input field.
Example: You have copied an area from Excel that is 5 columns by 5 rows, but starting from the current field, only a three-column range of input fields can be pasted. In this case, you get a warning message.
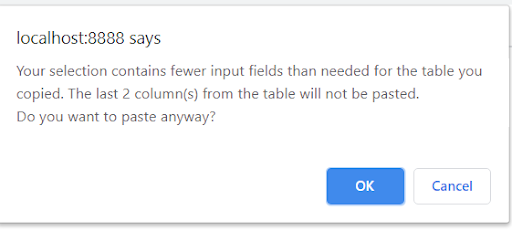
If you press OK, you will lose the two right-most columns of data that you copied from Excel. If you expected the cell range in Excel to fit nicely into the input fields of the Wrap, you may have selected the wrong input field to start the paste operation from.
Once you’ve pasted a cell range into the Wrap, you cannot paste it again. This is to protect you from accidentally pasting the same data twice, which is likely to make the contents of the Wrap invalid. You must always fetch new data from Excel before you attempt the next paste operation.
ExcelWraps provides version handling for wraps so that all previous versions of a wrap can be restored. If you don’t want this, you can now disable wrap history on the Wrap tab.

Being able to restore previous versions of a wrap is a very powerful function that costs very little in terms of resources. There is no obvious advantage of not enabling the Wrap History. You should consider disabling Wrap History mainly for static wraps that will never be restored to a previous version. These are often used for lookup, e.g. a list of article numbers, postal area codes, or account numbers.