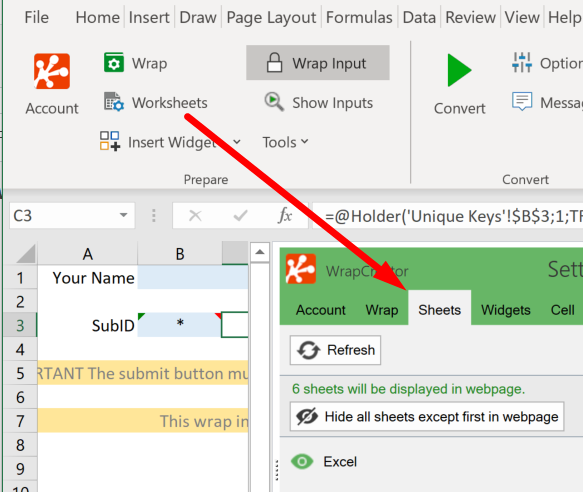
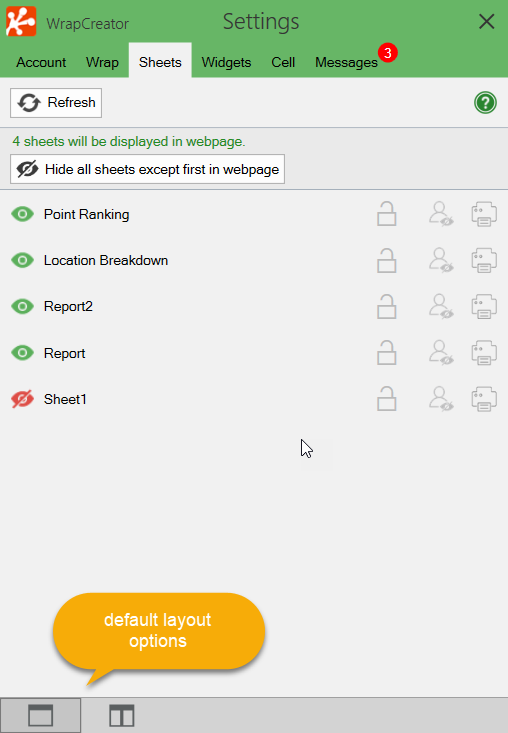
The Sheets tab lets you select the worksheets that will be visible on the web page. If your users need to print some of the information in a form or calculator, you may provide a specially formatted print sheet.
The Sheets tab of the task pane contains a list of all the worksheets in the workbook you are currently editing with Excel. You can hide all the background sheets that you don’t want to be visible in the wrap. You can hide or lock worksheets for users without the required permissions. A special worksheet can be used when printing a wrap.
Note that WrapCreator offers several ways to hide or lock worksheets. You can hide worksheets dynamically using the Hide Rows/Sheet widget. You can lock worksheets with the WrapSignOff widget or freeze the entire wrap instance when the corresponding work has been signed off.
During printing, the Print sheet setting overrides all methods of hiding sheets. Whenever at least one Print sheet has been defined, the printout or PDF will include exactly all the designated Print sheets, regardless of their visibility, and no other worksheets.
When there’s more than one worksheet in your workbook, we automatically hide all but the first during the conversion to a wrap. This is because an overwhelming majority of the workbooks with two or more worksheets use only the first worksheets for display – the rest of the worksheets just provide background information for the “front page”.
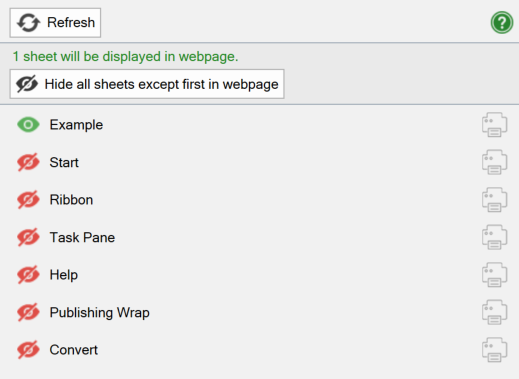
If you want to make more than one worksheet visible in the converted web page, click on the corresponding “eye” symbols in the list so that they turn green before you convert the spreadsheet.
By default, each worksheet appears as a separate tab in the wrap.
If you add a new worksheet to the Excel workbook, it may not be immediately visible in this list, To refresh the list, click on the Refresh button at the top.
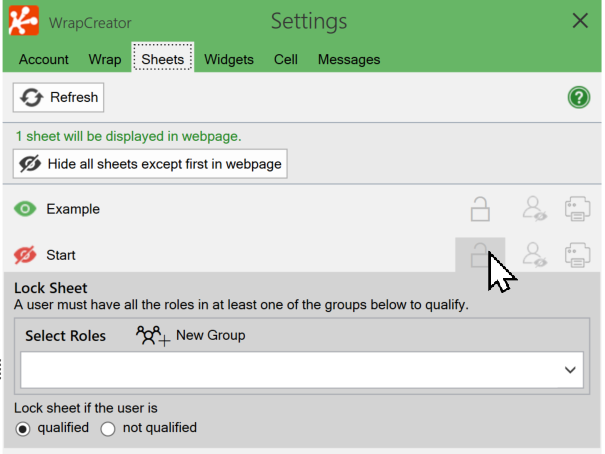
Removing redundant detail from a Wrap can be useful to reduce the technical complexity of a Wrap for office workers. You may want to show information in a read-only mode for users that aren’t authorized to edit it. You can lock or completely hide a tab on the Sheets tab, depending on the user’s roles.
You set the roles that lock or hide each tab separately in the list of worksheets on the Sheets tab. Navigate to the sheet in question and a Lock or Hide dialog will pop out when you hover your mouse over the corresponding column. In both cases, you are expected to select user roles.
You may lock a tab
The methodology you choose largely depends on your business requirements, but also on convenience – when it comes to roles, it’s always best if the definition is as brief as possible to reduce the risk of errors. If a tab is meant to be updated only by users with a few particular competences, and you want to lock it for all other roles, you will probably end up listing the few qualified roles and using the option (lock the sheet if the user is) not qualified.
Select the first role that makes users qualified. If additional roles are required for a user to be qualified, add them to the same group. A user must have all the roles in a group to qualify, e.g. “users must be both Administrator and Supervisor”.
To add an alternate combination of roles that also makes users qualified, click on New Group and add all the roles to the new group that a user must alternatively have. A user must have all the roles in at least one of the groups to qualify.
Again, use the locking methodology that you find the easiest to define.
Signature fields are unaffected by all locking mechanisms in ExcelWraps. This allows a user with the required permissions to revoke a freeze signature, if necessary.
When you lock a worksheet, its tab is still visible in the Wrap, but the fields cannot be modified. If you want to make a tab invisible for certain users, you can hide it completely. The role definitions that hide sheets work exactly like when you lock sheets as described above.

If your users may need to print some of the information in a Wrap, you can provide a specially formatted print sheet that looks better on paper than just a plain print or a screenshot of the browser tab. If you want to print a few of the tabs as they are, any combination of tabs can be selected as print sheets.
You select a sheet for printing by clicking on the corresponding printer symbol on the Sheets tab. Any number of worksheets can be selected for printing. To unselect a currently selected print sheet, click on the printer symbol again.
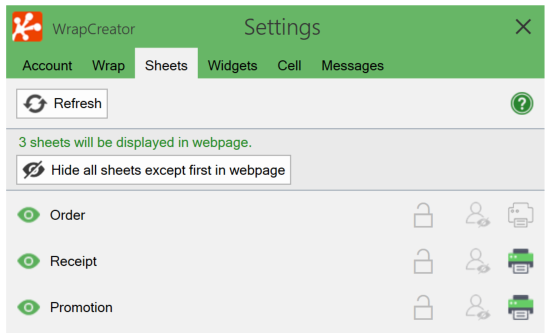
A print sheet is not hidden by default, but if you have created it specifically for printing it’s unlikely that you want the print sheet to be visible in the converted web page. You can hide it by clicking on the eye symbol in the left-hand column until it’s red.
Wraps are often split into sections, with each section occupying one worksheet in the source spreadsheet. Each worksheet is represented by a separate tab in the converted Wrap. To switch to another section of a Wrap, the user clicks on a different tab.
Sometimes it’s convenient to see more than one tab at the same time, e.g. to compare values from different dates. The user can select to have one or multiple tabs appear in the same window using a button in the user interface.

In the screenshot above, both the Task and Discuss tabs are visible in the same window, and accessible through horizontal scrolling. The <> button in the menu bar toggles between the single- and multi-tab layouts.
The developer can select either tab layout to use initially, when the Wrap is first opened, on a wide screen. The option for this is located at the bottom of the Sheets tab in WrapCreator. The user can always use the toggle button in the menu bar to switch to the alternate layout.
The initial tab layout setting is only with wide screen displays. When a Wrap is displayed on phones and other devices with narrow screens, the multi-tab layout is automatically disabled.